pCon.planner is a 3D software that requires a variety of system resources, including CPU power, RAM, and sufficient graphics memory. However, even if the recommended hardware requirements are met, laptops, in particular, can still experience performance issues. Here you will learn how to resolve these problems.
Why a Dedicated Graphics Card is Essential
Modern devices often have an onboard graphics chip that is energy-efficient and extends battery life. However, this integrated graphics solution is not designed for computationally intensive tasks such as displaying 3D content, materials, and lighting. This is where the dedicated graphics card comes into play, as it is specifically designed for such demanding tasks and is significantly more powerful.
Common Problems When Using the Wrong Graphics Card
When using graphics-intensive applications like pCon.planner, using the onboard graphics chip can lead to display and performance issues. These range from slow performance to graphical errors. To ensure that pCon.planner always uses the dedicated graphics card and runs optimally, follow these instructions:
- Right-click on the desktop and open “Display settings” from the menu.
- At the bottom, find the “Graphics settings” section.
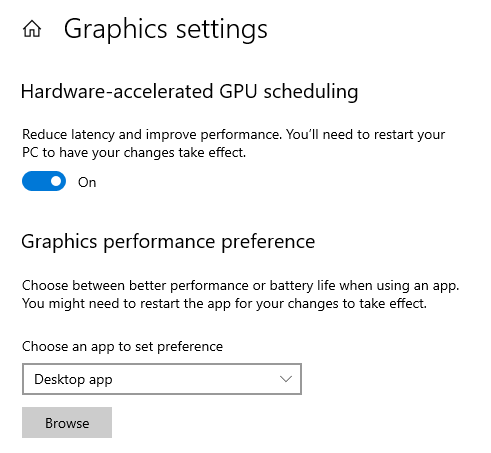
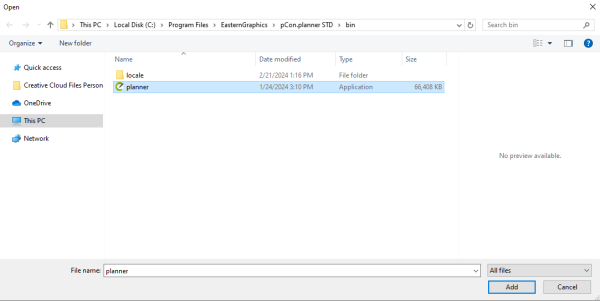
- Here, you can use the “Browse” button to select the installation path of pCon.planner and add “planner.exe” to the list. (Usually located on the local C: drive under “Program Files”).
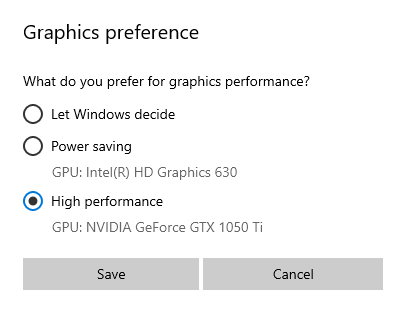
- Select “High performance” to ensure that the software uses the dedicated graphics card.
Additional Video Tutorial
For a detailed guide on selecting the dedicated graphics card and additional tips on graphics settings, we recommend our tutorial video. In this video, we show step-by-step how to make the switch and enable advanced settings in pCon.planner for shadow and texture quality as well as “quick rendering.” These adjustments are especially helpful for smooth navigation even with large projects.
With these settings, you can get the best performance out of pCon.planner in combination with your hardware. Simply click on the image to learn how to maximize your system’s performance:
For more questions or to dive deeper into topics, visit our Help Center. There you will find comprehensive information on all functions in pCon.planner.
Subscribe to our YouTube channel and stay informed about new tutorials on room planning, rendering and visualization! You can also subscribe to our pCon blog (in the footer).